
 Blog RSS Feed
 Twitter
 Facebook


Open een nieuw canvas van 300x300.
Set you're foreground to colour of liking and background to white.
Zet je voorgrondkleur op de gewenste kleur en de achtergrond op wit.
Filter-render-clouds
Filter - render - clouds
Filter-noise-add noise:
Filter - noise - add noise:

Add a new layer.

Add a new layer.
Voeg een nieuw laag toe.
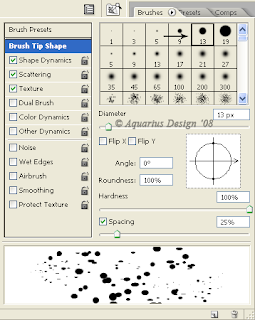
Select you're brush 5 pixels with these settings:
Selecteer je penseel, 5 pixels met onderstaande instellingen:


Take a colour in the range of you're foreground color and brush 'away'.
Gebruik een kleur in het kleurenspectrum dat past bij je voorgrondkleur en ga jezelf te buiten.
Add about 7 layers with different colours, you can even use white and a goldish yellow.
Voeg ongeveer 7 lagen met verschillende kleuren, je kunt zelfs wit of een goudkleurig geel gebruiken.
Mine looks after 7 layers like this:
Mine looks after 7 layers like this:
De mijne ziet er zo uit na 7 lagen:

Merge the brush layers.

Merge the brush layers.
Voeg de penseel lagen samen.
Go to blending options:
Go to blending options:
Ga naar blending opties:
Add a dropshade like this one:
En geef een slafschaduw zoals deze:


Add a outer glow like this one, with colour in you're colourrange, just play with the settings:
Voeg een 'buiten glow' zoals deze toe, met een kleur die past bij de voorgrondkleur, en 'speel' met de instellingen:

Add a new layer.
Voeg een nieuwe laag toe.
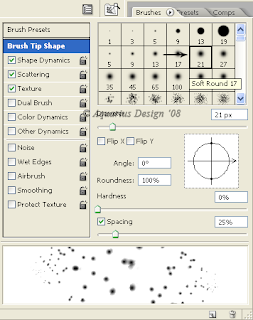
Go to you're brush and set them to a bigger one like this:
Go to you're brush and set them to a bigger one like this:
Ga naar je penseel en zet hem op een grotere zoals dit:
Add again about 5 layers with different colours of the brush and give the same blending option.

Add again about 5 layers with different colours of the brush and give the same blending option.
Voeg weer een laag of 5 met verschillende kleuren met het penseel toe en geef het dezelfde blending opties.
Merge these 5 layers.
Merge these 5 layers.
Voeg deze 5 lagen samen.
Change both of these (merged) layers the layer options to screen, lighten or what ever looks the best.
Zet allebei de (samengevoegde) lagen de laagopties op screen, lighten of wat jij het mooist vind.
Add a new layer and select you're brush again with this brush:
Voeg weer een nieuwe laag toe en selecteer het volgende penseel:
Brush a little with a white colour and set the blending option to this:

Brush a little with a white colour and set the blending option to this:
Verf een beetje met wit en zet de blending optie op dit:

If you like what you've created, merge the layers.
Als het bevalt wat je gemaakt hebt voeg dan de lagen samen.
You can now crop the image a little so that you can select only the 'nice' part.
Nu kun je de afbeelding bijsnijden zodat je alleen het mooiste gedeelte kunt gebruiken.
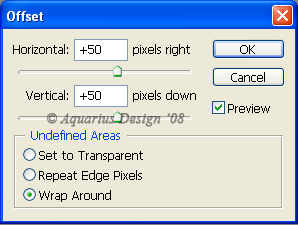
To make it seamless go to Filter-Other-Offset:
To make it seamless go to Filter-Other-Offset:
Om het naadloos te maken ga naar Filter - Other -Offset:
Now you can use you're glitter as a seamless pattern.

Now you can use you're glitter as a seamless pattern.
Nu kun je de glitter gebruiken als een naadloos patroon.
This is my result:
Dit is mijn resultaat:


If you like my tutorial and if you think it's useful please let me know!
Als je de tutorial leuk en leerzaam vind laat het dan mij weten!


2 comments:
I have just found your blog and love your tutorial. I hope you will write more tutorials relaed to scrapping. I can use all the help I can get!
Hallo, ek het die "link" op Digiscrap depot gekry....love the tutorial and could also understand your Netherlands as I am from South Africa and my home language is Afrikaans, which originated from all the people who came from Netherland/Holland to South Africa more than 450 years ago.
Groete van 'n baie warm Suid-Afrika
Elsie
Post a Comment